

This post was written by Emily Shieh, of Shieh Design Studio. Thanks, Emily!!
There are many ways to do gradient layering style in cold process soap. Some soapers are more into the exact measurements and step by step instruction. Some soapers, like me, are the spontaneous ones, we soap by feeling and everything is approximated, well, except recipe calculation of course, that's what soap calculator is for. Once you know the trick to gradient (or ombre) soap there are endless possibilities. But today I'm only going to write about the basic one color gradient, I'll write the more advanced gradient- multiple colors and mixing layering- later, maybe, if you are interested.
There are many ways to do gradient layering style in cold process soap. Some soapers are more into the exact measurements and step by step instruction. Some soapers, like me, are the spontaneous ones, we soap by feeling and everything is approximated, well, except recipe calculation of course, that's what soap calculator is for. Once you know the trick to gradient (or ombre) soap there are endless possibilities. But today I'm only going to write about the basic one color gradient, I'll write the more advanced gradient- multiple colors and mixing layering- later, maybe, if you are interested.
There are two types of gradient you can achieve in cold process soap, one using non-bleeding colorants and the other using bleeding colorants. Non-bleeding colorants are typically ultramarines, mica, oxide or FD&C lake dye. Bleeding colorants are FD&C dye and lab colors. You should choose your colorants depending on what visual effect you want to achieve. Non-bleeding colorants will give you more of a landscape or rock formation layering. Bleeding colorants will give you smoother definition between layering like they are blending together over time.

There's no better choice, just different choices. I'm going to show you both in this tutorial.
Step 1:
Chose a recipe that is not slow tracing, I found it easier to layer when the soap batter is not watery. When soap is slow to trace you run into situation as upper layer penetrating into lower layer. We want medium to heavy trace batter. If your recipe is slow to trace, consider water discount or choose a fragrance that speeds up trace. We don't want soap on a stick either!
Step 2:
I only need one more bucket other than the one I use to mix lye and oil/butter in. I don't like cleaning, so the least amount of tools I can use, the better. In one color gradient, I only need 2 containers and 2 spatulas. Mix in your fragrance choice for the whole batch. Now eyeball how many layers you want your soap to come out. I usually do between 7 or 8 for one color gradient, the most I have gone is 11 layers. Pour 1/7 of the batter into the free container, then pour 1/2 of what you just poured again. Again, I do approximation, and don't worry, you won't mess it up in anyhow. Think about it this way, let's say you are doing 7 layers in total including the top white layer, if your first layer is 1/7, you will need 1.5 times that to mix in your darkest color. If you are confused, don't be, you will understand why later.

Step 3:
Add the heaviest amount of colorant you want your bottom most layer to be in the batter portion you just poured out. In my case, I chose activated charcoal to show you the non-bleeding gradient soap. Now pour 1/2 of the colored soap batter into the mold. You might want to smack your mold on your tabletop to 'burp' your soap to avoid trapping air in the soap. I didn't do it because I was lazy. Now you should only have 1/2 of the colored batter left in your container #2. Eyeball what you have left in container #2, now pour about the same amount of container #1 (the uncolored one) into container #2 and mix well. You should now see the color in container #2 is much lighter than layer #1. Pour 1/2 of container #2 into the mold for layer #2.

Step 4:
Now repeat that process of adding uncolored batter into colored batter to 'thin' down the color and pour 1/2 into the mold to layer up.
Tip: if your batter is too watery, by all means, use a spoon to scoop or pour on the back of your spatula down low to avoid penetrating into the layers you already finished.

Step 5:
Do this until you see only 1/7 of total batter left, pour that layer down and proceed to do the fancy peak top you want, the batter should be pretty heavy traced by now. Or if you prefer, make a smooth top by running your spatula side edge across your mold cavity from one end to the other to level it out.

This is the other batch I did at the same time, but using lab color. You can tell the layers are not as defined as the activated charcoal above.

Here are the cut photos:

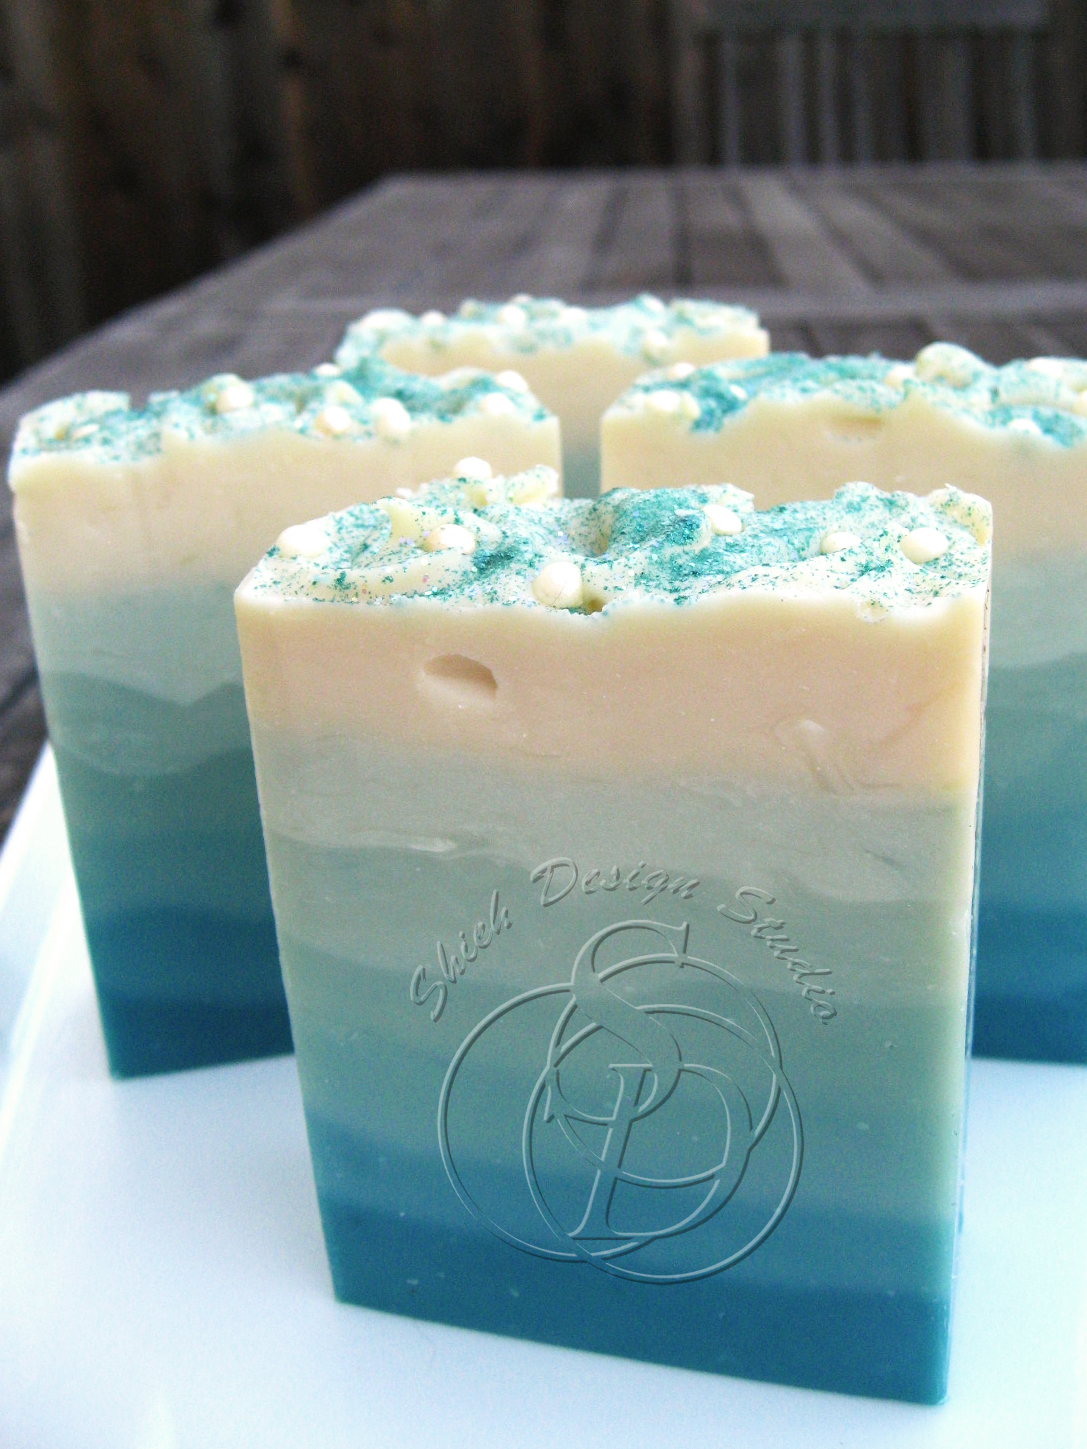
In time, this blue soap should have the layer edges blend smooth together creating a less defined seam.

Here's a photo of the Mango Lava I made 3 weeks ago using lab color. You can the bottom layers are not having defined edges anymore. You can see the top 2 layers are still holding the defined layer line because I added titanium dioxide to achieve a whiter soap.

After you master the trick of my one bucket gradient soap, you can start thinking outside the box and apply it to more advanced projects like these:


Thank you, Emily, for a fantastic tutorial!!
*
Advertisement